
Hike Panorama Ridge near Vancouver
If you’re an outdoor enthusiast, nature lover, or hiker in Vancouver, British Columbia, then the Panorama Ridge hike in Garibaldi Provincial Park should be at the top of your list. I’ve done this hike both as a day hike and as a backpacking trip and it’s one of my favorite hikes – anywhere. I plan to do it annually as long as I live in Vancouver, it’s just THAT good. Now, I’m eager to share everything you need to know to make your own trip to Panorama Ridge just as epic.
In this guide, we’ll cover essential logistics, including securing a permit, parking, and packing the right gear. We’ll also walk you through what to expect on the hike, from challenging switchbacks to serene meadows and the awe-inspiring ridge itself. Plus, we’ll highlight other incredible hikes in Garibaldi Provincial Park and offer tips for backpacking to fully immerse yourself in this natural wonder. Let’s get started!
Securing a Permit for Garibaldi Provincial Park
Before you hit the trail, you’ll need to secure a permit for Garibaldi Provincial Park. Fortunately, this process is straightforward and can be done online. Whether you plan to stay overnight or just visit for the day, it’s essential to reserve your spot in advance.
How to Book Online
To secure a backcountry permit or a day pass, visit the BC Parks website. Booking early is crucial, especially during peak hiking season.
Backcountry Permits vs. Day Passes
If you plan to camp overnight, you’ll need a backcountry permit. Backpacking permits become available 4 months in advance to the day you want to arrive.
Day hikers can opt for a day pass, which become available at 7am 2 days before when you want to do the hike. On weekends, the passes disappear almost immediately, so make sure you are ready at 6:59am to click and book the passes! Day passes are only required certain months of the year.
Both options grant you access to the park’s stunning trails, but make sure you choose the right one for your adventure. Having now done the hike as both a day hike and a a backpacking trip, I think it’s definitely easier to do as a day hike – though it’s a VERY long day. Here are some other pros and cons:
Day hike: The pros are that you can carry less gear with you, and that reduced weight means you can hike faster. That’s important when you’re covering nearly 30km. The cons are that it’s a very long day (plan to be at the trailhead at 8am at the latest). Read more about my recommendations for a long day hike here.
Backpacking: The pros are you that you can take your time because you can spend a night or more near Panorama Ridge and other great hikes. Plus, you can enjoy majestic sunrises and sunsets, and enjoy hiking with less crowds once the dayhikers head home. The cons are the extra weight makes the hike a little less comfortable and takes a little bit longer to get up to camp. check out this post for my top backpacking gear tips.


Where to Park and How to Get There
Navigating to the trailhead is the first step in your Panorama Ridge hike. The primary parking area is at the Rubble Creek Trailhead, which is the preferred starting point for most hikers.
Parking at Rubble Creek Trailhead
The Rubble Creek Trailhead is located off Highway 99, just before you reach Whistler. Ensure you follow signs to this specific trailhead and don’t end up at Diamond Head, for example. Even with a day pass, the parking lot fills up early so plan for an early start.

Hike Stats for Panorama Ridge
The Panorama Ridge hike is a challenging yet rewarding journey that offers some of the most breathtaking views in the region. Here are the key statistics for the hike:
- Distance: Approximately 30 kilometers (round trip)
- Elevation Gain: Around 1,520 meters
- Duration: Expect to spend about 10 to 12 hours for a day hike, including breaks and time to enjoy the views
- Trail Difficulty: Strenuous due to the long distance and significant elevation gain
- Trail Type: Out and back
- Best Time to Hike: Late summer to early fall when the trails are snow-free and the weather is ideal. If you attempt the hike in May or Early June, you will encounter snow on the ridge, and the lake may not be fully melted out.

What to Bring for the Panorama Ridge Hike
The 10 Essentials
Every hiker should carry the 10 essentials, including navigation tools, a first aid kit, and extra food. These items are crucial for any outdoor adventure, providing you with the resources needed to handle unexpected situations.
Water and Food
You’ll need at least 4 liters of water for the hike. There are plentiful places to refill your water as long as you bring iodine or a water filtration system – at the lake, Taylor Meadows, or along the stream in the last 5km before the summit. Pack plenty of snacks and meals to keep your energy levels up, especially for the challenging ascent to the ridge.
Clothing and Layering
The weather can change rapidly, so bring layers. The ridge is often colder than the meadows below, so pack a warm jacket and gloves. A good pair of hiking boots is essential for navigating rocky or snowy sections of the trail. I always bring hiking poles. You can read more about what I bring on a day hike versus a backpacking trip.

What to Expect on the Hike
Forest Switchbacks
The first 6 kilometers of the hike consist of switchbacks through dense forest. While the lack of views can be mundane, this section is relatively gradual and serves as a warm-up for the more demanding parts of the trail.

Meandering Meadows
Once you clear the forest, can choose to pass through Taylor Meadows or take the route by Garibaldi Lake. Taylor Meadows is slightly more direct and offers stunning wildflower displays in the summer. Either way leads you into beautiful meadows, with some flat spots.

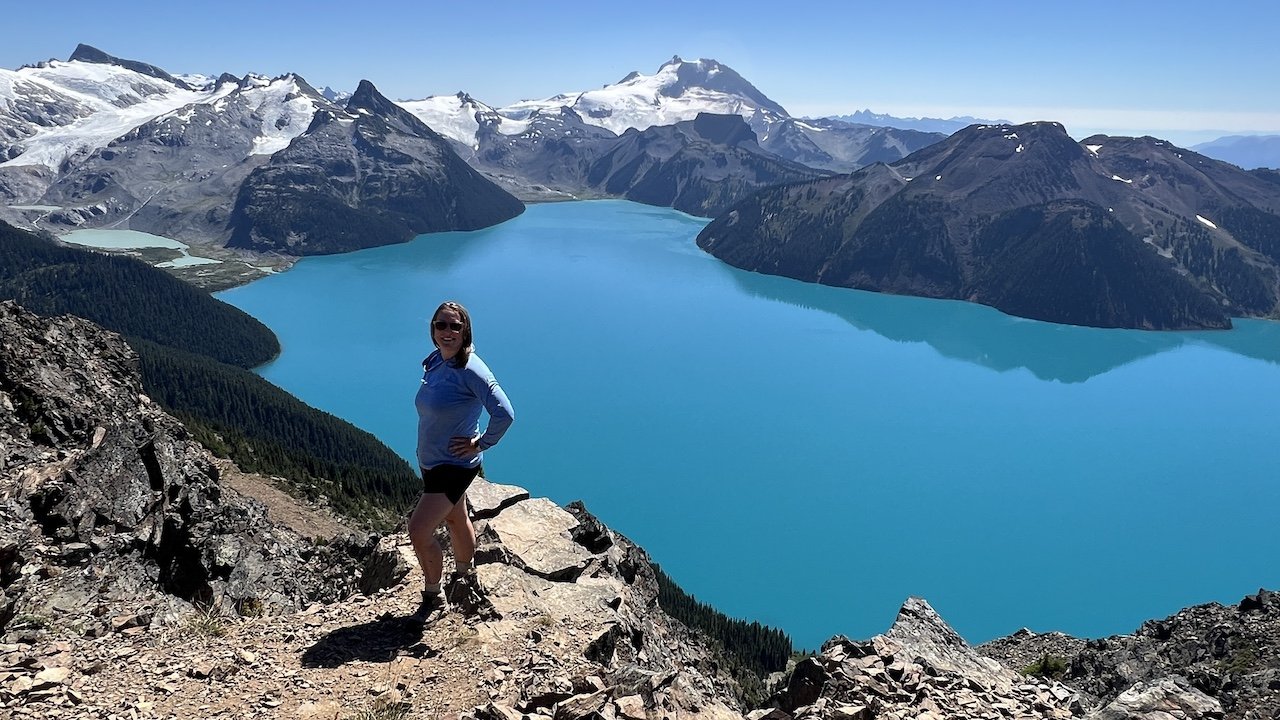
Ridge Hike with Epic Views
After the meadows, the trail transitions to a ridge hike. Here, you’ll be rewarded with a direct view of the objective ahead. Keep your eyes open for bears frolicking in the fields and lake area below.

Final Ascent to the Ridge
The last few kilometers are the most challenging, involving a steep ascent along the ridge. Depending on the season, you may encounter rocky or snowy terrain. Take your time and use trekking poles for stability.

Other Hikes in Garibaldi Provincial Park
Panorama Ridge is just one of many incredible hikes in Garibaldi Provincial Park. If you have more time, consider exploring these additional trails.
Black Tusk
Black Tusk is another iconic hike in the park. This trek is more challenging and requires scrambling, but the views from the top are worth the effort. It’s a great option for experienced hikers looking for a thrill. Make sure to bring a helmet if you attempt this hike. It shares most of the same trail with the route to Panorama Ridge, so could be good as a double summit or an attempt if camping at Garibaldi Lake for 2 nights.
Mt. Price
Mt. Price offers a less crowded but equally rewarding hike. The trail provides a different perspective of the park’s landscapes and is ideal for those seeking solitude and adventure.
Other activities nearby
- If you’re visiting from out of town, check out my perfect 3 day Vancouver itinerary
- If you’re spending more time in the Sea to Sky Corridor, here are my roadtrip tips.
- Past Whistler, another hike in Garibaldi Provincial Park that requires NO day permits is Wedgemount Lake.
- If you are looking for other nature day trips from Vancouver, here are a few more to consider.
Conclusion
Hiking to Panorama Ridge in Garibaldi Provincial Park is a bucket-list adventure for any outdoor enthusiast. The diverse landscapes, from forest switchbacks to alpine meadows and panoramic ridges, offer a truly unforgettable experience. By following this guide, you’ll be well-prepared to tackle the trail and fully appreciate everything this iconic hike has to offer.


